It’s a little unfortunate how much we rely on something as unreliable as a computer. There you are, working along, happily doing your thing, and suddenly Windows (or OSX, or Linux, or BEOS, or whatever it is that sits between your hardware and your web browser) pukes up some error and refuses to boot, work, or be otherwise useful.
Fixing the computer itself is just a matter of time and money; getting back those pictures, documents, emails, and other files that you always meant to back-up is another issue. So in this article I’m going to show you a simple way to recover documents from a system that won’t boot.
Yes, you can do this
I know what you’re thinking: “Data recovery” is a serious, complex, highly-technical procedure that you pay someone zillions of dollars (or at least a six pack and a pizza) to do. Most of the time, it’s not really that complex. And thanks to the industrious folks of the open source software world, there are some pretty user-friendly — and FREE — tools out there to get your files back. So don’t panic, and don’t doubt yourself: you can do this!
Is your computer a candidate?
For the method I’m describing to work, your computer at least needs to turn on. If it’s totally dead, or failing due to overheating, you’re going to need to take more extreme measures beyond the scope of this article. If turning on your computer gets you somewhere between the initial text on the screen and an actual usable desktop, it’s a good candidate for this kind of data recovery. Some examples include:
- You start it up and get a “blue screen” error during boot
- You get an error like “ntoskrnl not found”
- You get to a blank desktop with a mouse cursor, but no icons/panels/menus
- The computer boots up, then immediately reboots over and over.
- You’ve got some kind of virus or malware, and you are afraid to start up the computer lest it spam your entire contact list with nasty stuff.
Gather the tools
If the computer in question is your one-and-only machine, you’ll need to find a friend with a working computer and internet connection (like, hey, maybe the one you’re using to read this article!). It’ll also need a CDRW or DVDRW drive to burn the boot CD. You’ll also need a blank CD, and something that you can copy the recovered data over to, such as a USB flash drive or USB external hard drive. If you have a home network with a file server of some kind, that might work too.
Once you have all this, it’s time to get our most important recovery tool: Lubuntu.
What is Lubuntu?
Lubuntu is a variation of Ubuntu, a free operating system based on GNU and Linux. Unlike the regular version of Ubuntu, Lubuntu is smaller, faster, more compatible with older hardware, and has a desktop layout that is very familiar to anyone who has used Windows in the last 15 years or so. Like most versions of Ubuntu, the Lubuntu CD is what we call a Live CD, meaning that when you boot to it you get a live, fully functional desktop that you can use just like you would if it were actually installed.
Download the 32-bit (x86) Lubuntu .iso file from here. Even if you have a 64-bit computer, get the 32-bit version. It’s more compatible, and perfectly adequate for our purposes here. Once it’s downloaded, you’ll have to burn the image to a CD; if you aren’t sure how to do this (it’s slightly different from how you would, for example, burn a document to a CD), follow the instructions provided by Ubuntu.
Booting to a CD
Once the CD is ready, put it in the broken PC and start up the PC. Just about any computer made in the last ten years should have no problem booting to a CD (unless of course it doesn’t have a CD drive), though it might not do so without some intervention on your part. Most modern computers have some kind of “boot menu” that allows you to choose to which device you want to boot when you turn on the computer. Usually hitting “F12”, “F11”, or “F10” right after you turn on the PC will give you this menu. If you’re really stuck getting the system to boot to the CD, see this page for some help.
Getting to the Lubuntu Desktop
If you’ve booted to the CD, the first thing you should see is a menu for picking the language you want Lubuntu to use. Hopefully you know the answer to this one :D.
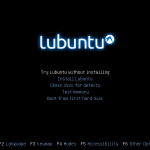
Once you’ve picked the language, you’ll see a menu of choices for how you want to boot; the default option, “Try Lubuntu without Installing”, is exactly what you want. We will not be installing anything to your computer here, just running Lubuntu from the CD.
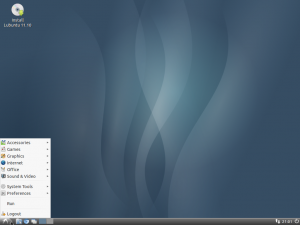
After choosing this, just wait a minute or two, and you should be at a pleasant blue desktop.
A quick tour
The Lubuntu desktop is pretty straightforward, but for the sake of completeness, let’s have a quick tour.
The main part of the screen is the desktop, it works pretty much like any other desktop you’ve ever used. Right now it’s probably empty except for an icon that says “Install Lubuntu”.
At the bottom is the panel, where you’ll see a lot of icons and things. Going along it from left to right, we have:
- At the far left of the panel is an icon with what is supposed to be a stylized bird in flight, but probably looks to you more like someone scratched an upside-down V into the panel with a pocket knife. This is the “Start Menu” for Lubuntu. Click it, and you’ll see a menu pop up with a variety of software categories. These are all programs that you can launch from the Live CD, so feel free to play a round of solitaire or two if you wish.
- An icon of a file folder, which launches the file browser; we’ll be using it in just a minute.
- An icon that looks like a remake of the old Simon game by someone obsessed with the color blue. This is the web browser, Chromium. If you’ve ever used Google Chrome, it’s the same thing except without all the stuff Google puts in to spy on you.
- An icon that looks like two little windows on top of each other. Clicking this will minimize all open windows.
- To the right of that icon, you’ll see what looks like a blue and a grey square. This is what we call a “pager”, not to be confused with the obsolete communications device. Basically, Lubuntu has two “virtual desktops”, so that you can have two different sets of windows open at once. This pager lets you switch between desktop 1 and desktop 2. If that’s confusing, don’t worry, you don’t really need to use it here.
- After the pager comes the task bar, which shows entries for any open program windows, just like it does in Windows.
- Next, a “system tray”, where programs running in the background can show notifications and icons. Your tray probably only has a network icon, telling you if you’re connected to a network or not.
- The CLOCK!!! Finally something that needs no explanation!
- Last of all, there is a little circle with a line through it. If you’re thinking this looks like the symbol on your computer’s on/off switch, that’s because it’s the universal symbol for on/off. I’ll leave it to your imagination what this icon does. 🙂
Hopefully you feel pretty comfortable with Lubuntu at this point, and see how simple it really is. So let’s get down to business.
Getting to your files
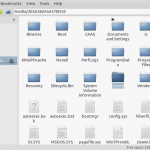
Once you’re at the desktop, you’ll want to start by locating your files to see if there’s anything left that can be recovered. Launch the file browser from the icon that looks like a folder in the lower left. The file browser window should look pretty similar to other file browsers you’ve seen, such as Windows Explorer or Apple’s Finder. The main pane shows you a series of folders in the current directory, and to the left is a list of various locations or devices you can browse known as Places. Near the top, above the main pane, is a field that shows the current location (a.k.a. URL) that you’re viewing known as the Location Field.
If your hard drive is actually working and accessible, it should show up towards the bottom of this list, with a silver box icon (that’s what an actual hard drive looks like, in case you’ve never taken the panel off your computer to look at it). It’ll be labelled something like “80 GB Filesystem” or “250 GB Filesystem”, though the size depends on what the actual size of your drive is. If your computer had multiple partitions (many PCs come with something called a “recovery partition”, which is used to factory-reset your machine), you’ll see an icon for each one, and if you’ve got your USB drive plugged in, you’ll see that too.
(If you don’t see any of these icons, it means your hard drive is probably not functional enough for Lubuntu to find it. In this case, you might want to seek help from someone more knowledgeable; and, to be honest, the outlook is probably grim.)
Click on the drive that represents your C:\ drive, it’s most likely the one with the largest size. You should see a list of folders that includes “Documents and Settings” (or “Users”, on Windows 7 or later), “Program Files”, and “Windows”.
Where are those files?
Without access to your programs, or nifty abstractions like document libraries or the “My Documents” folder, you might be a little disoriented locating your files. So here it is in a nutshell:
- For Windows XP, 2000, or Vista: they’re under “Documents and Settings” in a folder that should be the same as your login name (This is called your “Home directory”). Sometimes, if you just used the default account that came with the PC, it might be labelled “User” or “Administrator”, or “Owner”. Under this folder, your “My Documents” files are found in the “Documents” folder, and the contents of your Desktop are in the “Desktop” folder.
- For Windows 7 or later, look under the “Users” folder for a folder with your login name. The “Documents” and “Desktop” folders will contain most of your actual files.
- For Windows ME or earlier, there’s probably a “My Documents” folder right there in the root of the drive.
- Email files are usually buried deep within the recesses of hidden folders in your home directory. Depending on which email client you use, you may have to do a little research to learn where the files are located; fortunately you can do that right from the Lubuntu desktop by firing up Chromium! If in doubt, they’re almost certainly contained in your home directory, so grab the whole thing.
Where to copy those files
USB Drive
If you’ve got yourself a USB flash drive or external hard drive, you can open it in Lubuntu the same way you opened your hard drive: just click the “places” icon that corresponds to it. From there, copying files off is just drag-and-drop just like on Windows.
File Server
If you have a file server on your network, you can copy your files up to it as well, though doing this under Lubuntu is a little different from Windows or OS X. To browse your local network, open a file manager window and type:
smb://
… in the location field (SMB is the technical name of Microsoft’s file sharing service). This will allow you to browse your local workgroups and find your server. If you know the server’s name or IP address, you can directly access it like this:
smb://server/sharename
While SMB is one of the more popular file serving protocols (and usually the one enabled by default on home file servers), it’s not the only one. Lubuntu’s file browser will support moving files over FTP, SFTP, SSH, NFS, webdav, and other file sharing protocols you might have on your webserver (or another computer on your network). The formula to put in the location bar is simply:
procotol://server_name_or_address/share_or_folder
Cloud service
If you haven’t a USB drive or a file server handy, but you are able to connect to the Internet, Lubuntu can talk to some popular cloud services. In fact, Ubuntu’s own UbuntuOne cloud service offers 5 GB free, and can be easily installed on the Live CD (Note that, while software can be installed on the Live CD desktop, (a) it only lasts for one boot because (b) it’s installed in memory, which also means that you need enough memory to allow for this).
To install UbuntuOne on the Lubuntu Live session:
- In the menu under “System Tools” launch “Synaptic Package Manager”
- When synaptic launches, hit the “Reload” button at the top-left of the window
- Click Synaptic’s “Search” button and search for “ubuntuone”
- Click the checkbox next to “UbuntuOne-client” and “UbuntuOne-control-panel-gtk”; agree to the additional dependencies, then hit “Apply”
- Click on the menu and select “run”
- Type “ubuntuone-control-panel-gtk” in the “run” box and hit ok.
- Now you can either sign up, or enter your existing account details
- If you’re prompted about creating a keyring password, just leave it blank. Everything we’re putting in here is going away as soon as the computer shuts down, so we don’t need to worry about long-term security here.
When you’re done (IMPORTANT!)
When you finish copying off your files, it’s important to get out of things correctly so you don’t risk corrupting the disks you’ve used. In the file manager, right-click the hard drive entries under “Places” and select “Unmount Volume” or “Eject Removeable Media”, whichever appears. This is analogous to the “safely remove” procedure you have to do under Windows when using USB drives.
Why is this necessary? Most operating systems, including Lubuntu, don’t write information to hard drives and other devices immediately when you make a change. Instead, they make these changes little-by-little in the background so your computer isn’t completely hung up writing to a device. Most of the time, this happens in a split second, but sometimes (especially when dealing with a slow drive or big files) it may drag the procedure out several minutes. “Unmounting” or “Safely Removing” a device forces the system to make sure any pending changes have been made and the device is cleanly closed out.
Once you’ve done this, click the on/off icon on the lower right side of the screen and shut down the system. Don’t just turn it off by cutting the power, that could further corrupt your hard drive.
What do I do when I have problems?
In ideal circumstances, the process I’ve described here is pretty easy, but when we’re dealing with a broken computer there’s no telling what can happen. If you run into problems booting to Lubuntu or using it, help can be found at the Ubuntu forums. If you prefer real-time help, you can get connected to Lubuntu volunteers over IRC (#lubuntu on FreeNode).
Hope this helps you get your data back! Remember, you can do it!
Did this article help you out? Post a comment and let me know!


One Thought on “Recovering data from a PC: a guide for “not computer people””